
Every teacher knows the pattern. You spend thirty minutes explaining a new concept, the room stays quiet, and then you discover during the homework review — or worse, during the test — that a third of the class lost you in the first five minutes. The lecture used up the one resource that was genuinely scarce: the time you and your students were in the same room.
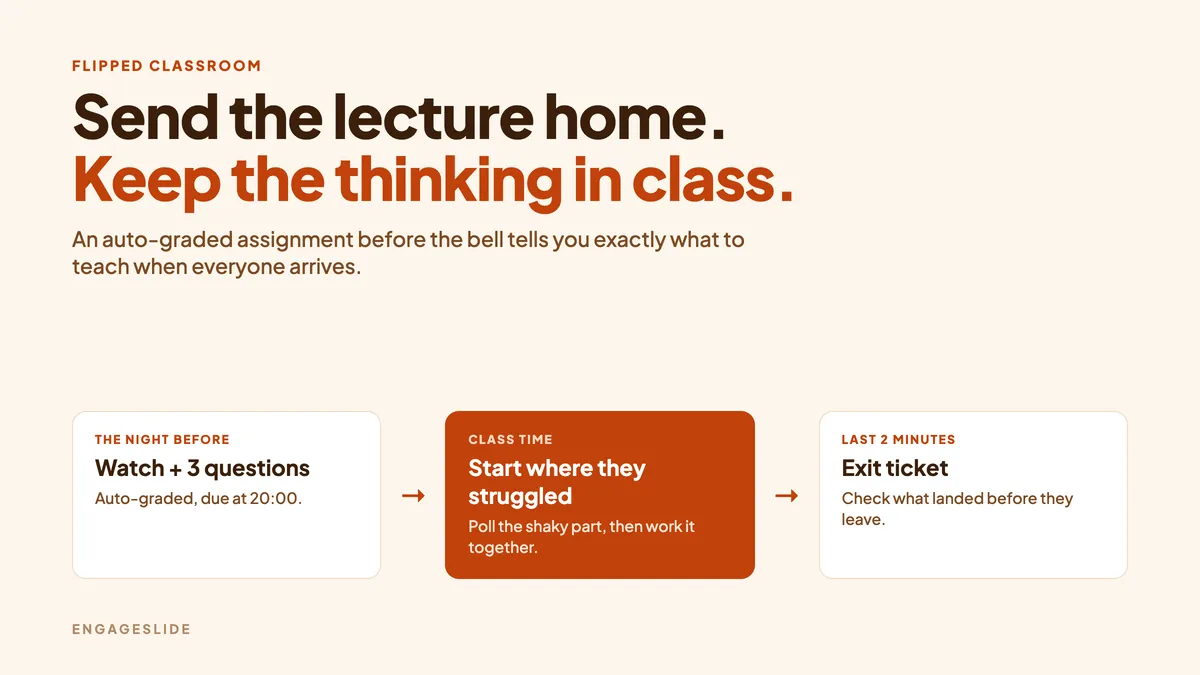
The flipped classroom swaps those two halves. Students meet the new material on their own before class, and class time is spent on the part that actually needs you — questions, practice, discussion and the messy bits. This guide shows how to run that model concretely with EngageSlide assignments for the pre-class work and live polls and Q&A for the in-class half.
What “flipped” really means
The flipped classroom is often described as “watch a video at home”. That is only the delivery part, and on its own it usually fails: if nobody checks the pre-work, a good share of the class arrives having watched nothing. The model works when three pieces are in place:
- Short pre-class input. A video, a reading or a slide deck — typically 5–15 minutes, not a full lecture.
- A small accountability check. Two or three questions that are graded automatically, so students have a reason to do the pre-work and you get data before class.
- Class time built on that data. You start with the exact points the class got wrong, instead of teaching everything again.
The pre-class quiz is not there to grade students. It is there to tell you what to teach when you walk in.
Step 1: Build the pre-class assignment
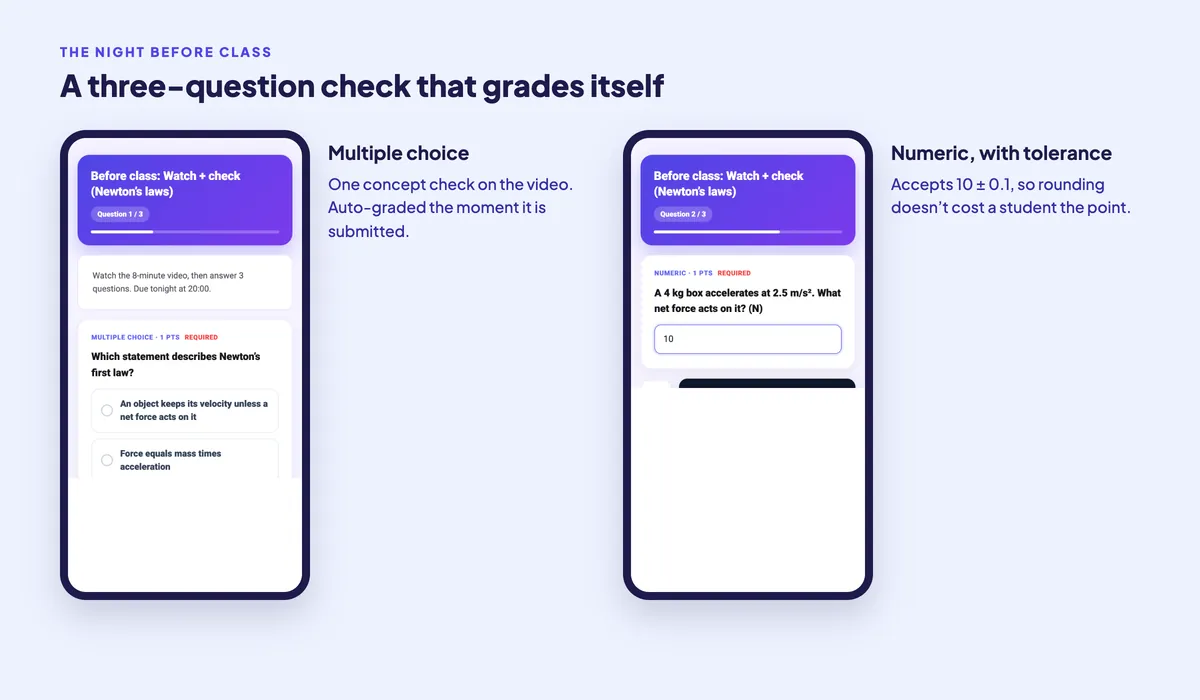
In EngageSlide, create an Assignment and add two or three questions about the material. Keep it short — under five minutes of work. The question types that fit a pre-class check best are:
- Multiple choice for a concept check (“Which statement describes Newton’s first law?”).
- Numeric for a calculation, with a tolerance so rounding doesn’t cost a point.
- Short answer for a one-line explanation.
- Short answer, ungraded: “Which part was hardest to follow?” This single question is often the most useful thing in the whole assignment.
Objective question types are graded automatically as soon as a student submits, so you are not marking thirty sheets at midnight. You can set a due date, a time limit and the number of attempts, and you can add a worked explanation that students see after submitting.
If you already have the questions on paper
You don’t have to retype an old worksheet. EngageSlide can read an exam image or PDF and turn it into assignment questions, which you then edit. For maths, there is a built-in equation editor, so fractions, powers and roots render properly instead of being typed as plain text.
Step 2: Read the results before class starts
Ten minutes before the bell, open the assignment’s responses. You are looking for three things:
- The question with the lowest score. That is your opening topic.
- The wrong answer that repeats. A shared wrong answer usually points at one specific misconception, not general confusion.
- The “what was hardest” replies. Students name their own sticking points more precisely than any score can.
This is the whole payoff of flipping. You walk into the room already knowing that eleven students can’t separate action from reaction, and that free-body diagrams are the second problem. Nothing in a traditional lecture gives you that.
Step 3: Open class with the shaky part
Start the live presentation with a poll that puts the pre-class data on the big screen. Ask the class directly which part felt shakiest, or show a question from the assignment again and let everyone re-answer live.
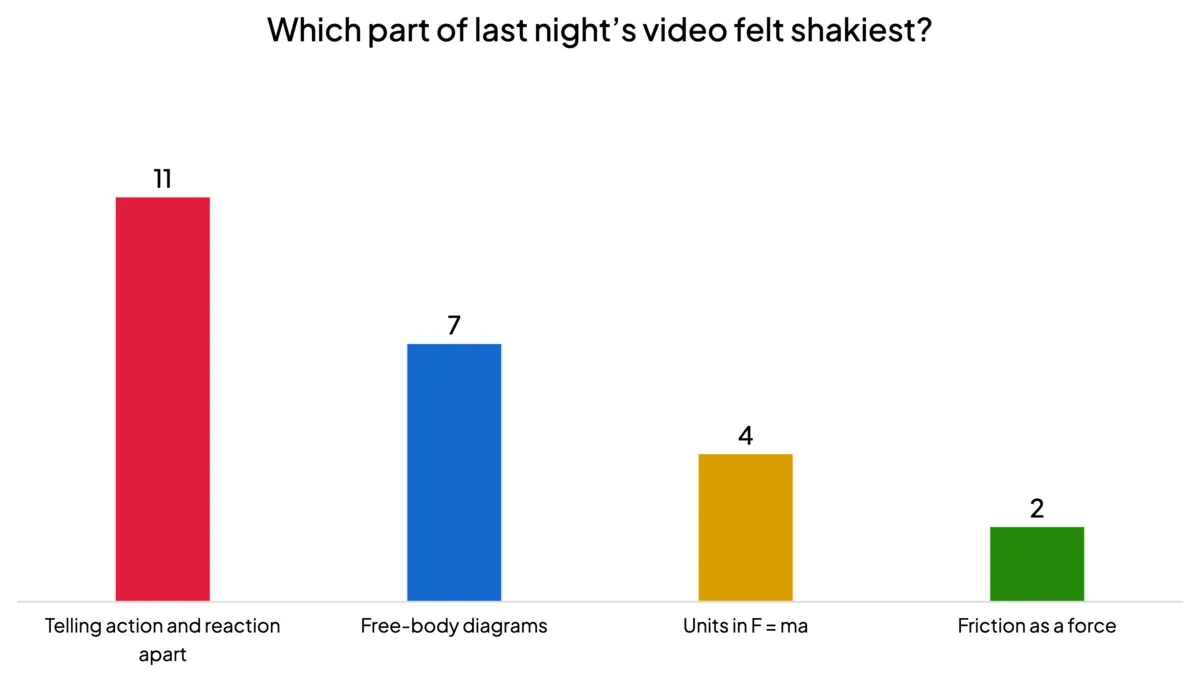
Two things happen at once. Students see that they are not the only one who struggled, which makes them far more willing to ask. And you get a public, shared agenda for the lesson: “Twenty-four of you voted, eleven picked action and reaction — so that’s where we start.”
From there, the tools that work well in the live half are:
- Q&A. Turn on questions so students can ask from their phones, anonymously if you allow it, and upvote each other’s questions. The top-voted question is usually the one most of the room is quietly stuck on.
- Quiz slides. After you re-teach a point, check it immediately with a two-question quiz. If the class gets it, move on; if not, stay.
- Word cloud. Good for definitions and quick recall: “One word that describes inertia.”
- Whiteboard. For anything with a shape — diagrams, graphs, free-body sketches — have students draw on their phones and compare a few on screen.
Step 4: Use class time for work, not delivery
Once the confusion is cleared, spend the rest of the lesson on problems, cases or group work — the activities students used to do alone at home with nobody to ask. Your job shifts from delivering content to circulating, prompting and correcting in real time. This is where the flipped model earns its reputation: not because the video is better than you, but because your attention moves to where it is scarce.
A practical rhythm for a 50-minute class:
- 0–5 min: poll on the pre-class results, name the plan for the lesson.
- 5–15 min: re-teach the one or two shaky points, with a quick quiz check after each.
- 15–40 min: practice — problems, pairs, a whiteboard sketch, Q&A open the whole time.
- 40–50 min: one harder application problem together, then an exit check.
Step 5: Close the loop
End with a two-minute check so you know whether today worked: a short survey, a confidence scale, or a single quiz question. If the results are weak, the next pre-class assignment becomes a revision set rather than new material. Our guide to using quizzes to check understanding has more question patterns for this.
Students who missed the pre-work still need a route back in. The assignment stays open as long as you keep accepting responses, so latecomers can complete the check afterwards — and the responses list shows you who did.
Making it stick: honest advice
- Start with one lesson, not a whole course. Flip the topic students find hardest every year, and see what changes.
- Keep the pre-work genuinely short. If it takes longer than about ten minutes, completion drops fast.
- Make the check count for something small. Participation credit is usually enough. Heavy grading turns the pre-class quiz into a stress test, and students start guessing instead of thinking.
- Never re-lecture the video. The fastest way to kill a flipped classroom is to repeat the content in class. Students who did the work will stop doing it.
- Plan for no internet at home. Offer a printable version or class-time access for students who need it, so the model doesn’t quietly exclude anyone.
Does it actually help?
Flipping is not magic on its own — the pre-class material still has to be good, and the class time still has to be well designed. What it reliably changes is information: you stop guessing what your students understood. Combined with fast feedback on their work — see our post on instant feedback on assignments — you get a loop where students find out what they don’t know while there is still time to fix it, and so do you.
If you want to try it this week: pick one topic, record or find a ten-minute video, add three questions, and open your next class with the results. That is the whole method. More classroom ideas are on the EngageSlide blog.